Create*Bloom*Grow

Growing through life creatively…


Leave a comment

You want to be WHAT for Halloween?!?!?! A Wii Remote

When I was growing up I always imagined how cool it would be to make my children’s Halloween costumes. My Mom made some fantastic costumes for me (although the beautifully painted cardboard butterfly wings did not fare so well in the rain). My daughter has given me a number of opportunities to flex my creative muscle, but it wasn’t until last year that my son wanted anything other than an “off the rack” costume. Or perhaps it could be better explained that this Mommy was not up for re-creating a Star Wars character herself when it could be easily purchased.

Rewind to last September when I asked my son what he wanted to be for Halloween. He said a Wii Remote. Excuse me? Come again? A what? A Wii Remote. OK….

I thought he was kidding. I thought be might change his mind. Then I suddenly realized this was a Golden Opportunity to actually create a super cool costume for him.

I started with making the basic costume out of 2 shipping boxes. I left the flaps opened on the side so he would be able to stick his arms out. I also cut a hole in the front so he would be able to see. I also left the bottom flaps separate so that walking would be easier. I duck taped the heck out of those 2 boxes to keep them together. My daughter was gracious enough to help me model this part of the process.

Halloween

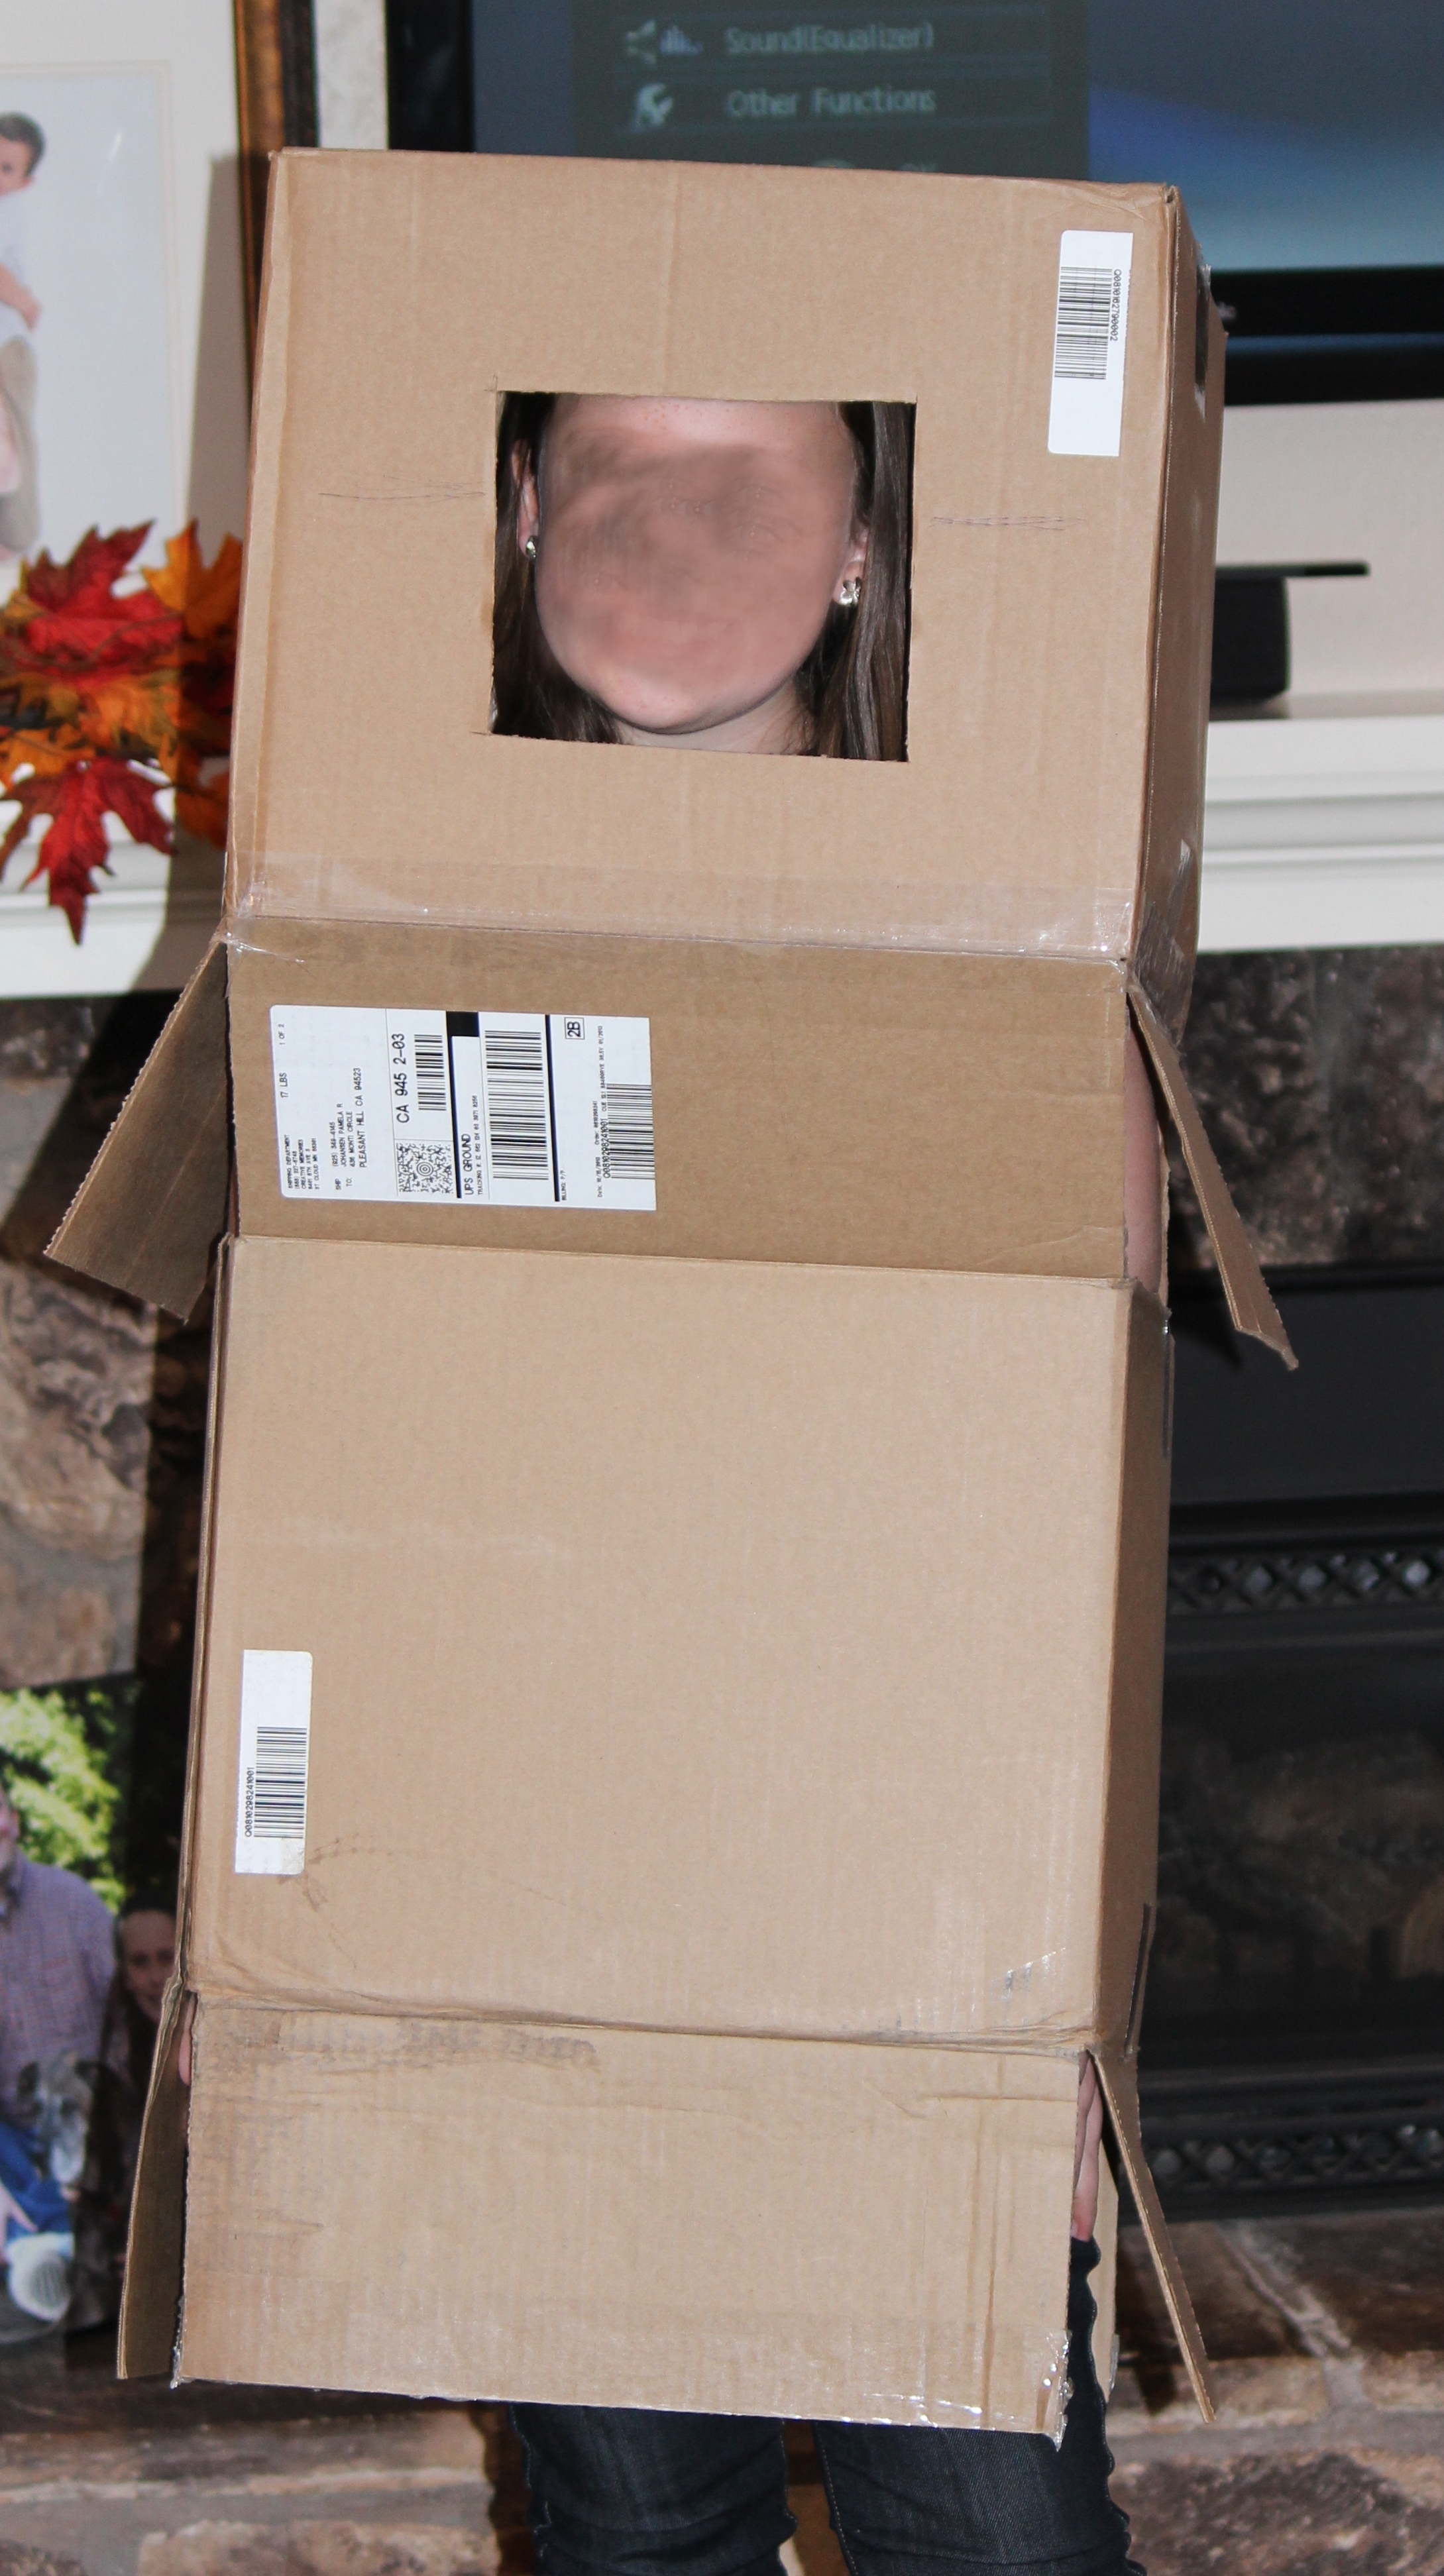
We quickly realized that having a box rest on your head was not going to be a comfortable scenario for Halloween success. I was able to add shoulder straps inside so that the costume rested evenly on my son’s shoulders instead of on top of his head. Sadly, my photo of this great idea is missing and the costume has been passed on to someone else to enjoy.

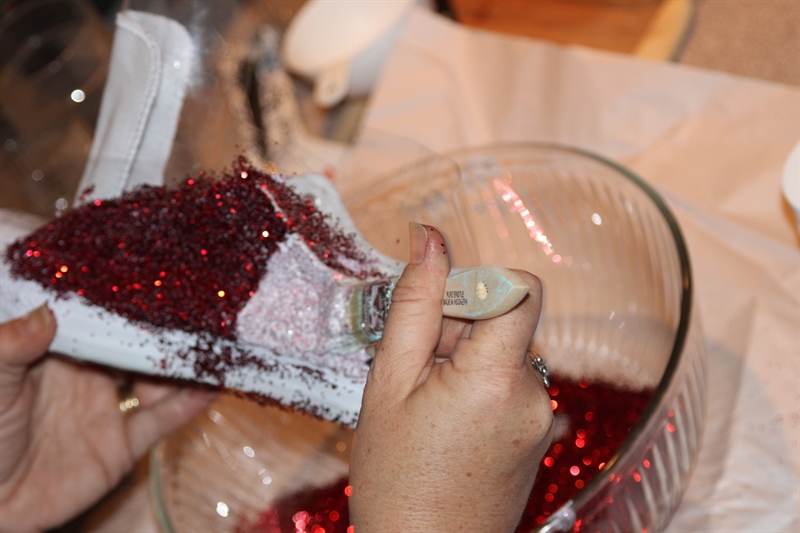
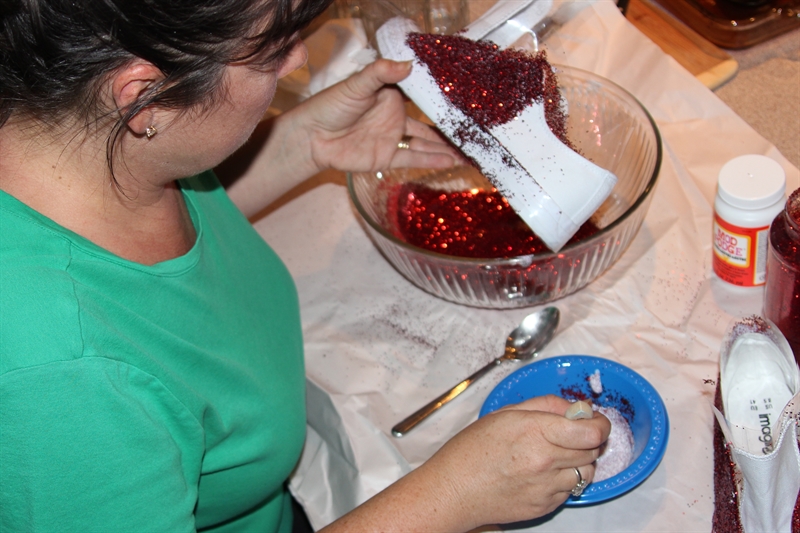
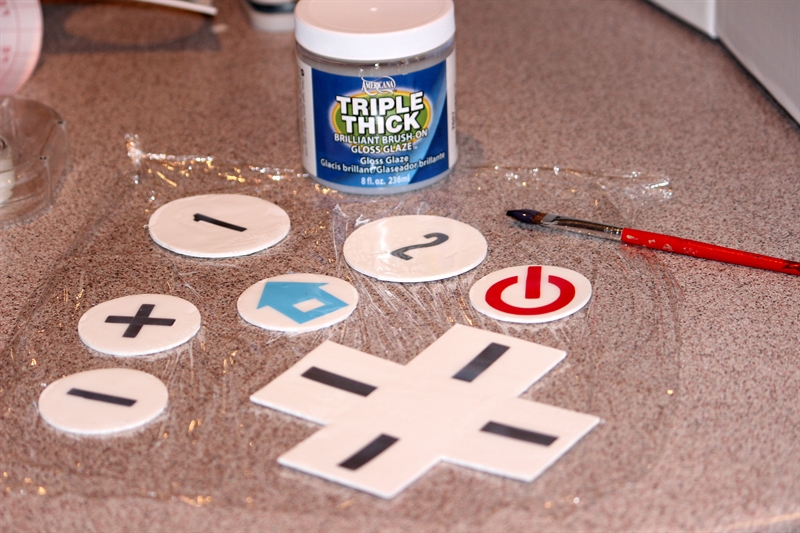
After getting the structure of the costume finalized, it was time to start the design aspect. I covered the entire costume with white contact paper. Then it was time to make the buttons. Wanting to have a something that was raised off the costume, I cut out pieces of white craft foam. The symbols on the various buttons were cut from vinyl. When I could, I enlisted the help of my trusty Cricut to cut the shapes. I attached the vinyl designs to the white foam “buttons”. I then painted over the entire button with Triple Thick Gloss Glaze to give it a glossy, finished look. I then attached the buttons to the costume with super strong Glue Dots.

IMG_6365

The need to have a cut out in the front so my son could see out did get in the way of my designing a bit, but I found a solution. I made the opening smaller (working hard to line it up so that where his eyes were while wearing the costume lined up with the design) and covered it with sheer fabric. Viola! An here is the finished product…

IMG_6514

It ended up being a really cool costume. Everyone wanted to know who the Wii Remote was. He was a man of mystery. I think my son liked that he was wearing his own clothing underneath and could take the costume on and off as needed instead of struggling with wearing his costume all the time. As I dropped him off at school I told him, “Don’t let the other kids push your buttons!”. I think he rolled his eyes, but I don’t know because I could not see his face.


Leave a comment

Masquerading at the school auction

Recently I had the opportunity to do a very fun project. The theme of the auction at our school was Masquerade Ball. They brought someone in to sell masks which was nice for most people, but was never going to fly for me as I did not want a mask that could possibly look like someone else. Throughout my life I have definitely had the need to be unique. Heck with worrying if someone else would have the same dress at my Junior Prom, I did not want anyone else to even have the same color! I opted for bright purple which in the end was only worn by one out of probably 300 other girls. Anyhoo…

I also love to make things which meant this was the perfect time to stretch my creative muscles. Luckily, I had a few partners in crime. 3 of my girlfriends and I went on a road trip to visit the new Hobby Lobby on my birthday followed by lunch at Fenton’s. What could any 42 year-old birthday girl like more than a morning of crafty inspiration followed by a super yummy lunch and amazing ice cream with like-minded friends? We picked up supplies and inspiration all over the store.

We met a few days later to put together the masks. I did do a little bit of prep work to my mask as I wanted it to be glittered (a tremendous shock for anyone who has been reading my blog). I also decided that the base should be painted black before I glittered it. My husband assisted by spray painting it with left over paint from a Pinewood Derby car.

The basic base painted black:

????????

Then I gathered my glittering supplies:

  • Mod Podge
  • Bowl
  • A little water
  • Black glitter
  • a straw to stir and a brush

????????

Next I worked in small sections painting some of the Mod Podge, water, glitter combination over the mask and then pouring more glitter over each section. I like things really sparkly…

????????

????????

Part of the reason for wanting to make our own masks was that most of the masks sold were the type that attach to your head with an elastic. I would go nuts having something in my hair like that. It seemed much more elegant to hold it on a stick. We got together and the glue guns went flying. I love that they are all so totally different. Here are the final results:

photo 4(1)

A few notes on what it took to create mine:

  • Think about the sizes and proportions of the different embellishments. I had to go back to the store for additional trim as I found the original ones I selected were all the same size.
  • I used a rhinestone clip on earring for the embellishment at the forehead. Wish I had a bigger one, but I worked with what I had.
  • Don’t be afraid to go big.  In the end, I loved mine, but it was not as over the top as I would have liked.

We brought a vase to the auction, so we had someplace to put our masks the night of the event.

photo 5

photo(8)

And finally, a better view of my mask as featured on the lovely face of my daughter dressed up in my old Senior Ball dress. In my effort to be different, I ditched the color craze and made the dress myself.

????????

Happy crafting!


Leave a comment

Lenten Crafting

I gave up something for Lent every year when I was growing up. For those of you not familiar with Lent, it is the 40 days before Easter in the Catholic Church.  A time of waiting and preparing. Eventually, it became more popular to “do” something instead of “give up” something.  Truthfully, I have not had my act together to even do that over the last few years, but this year I am going to make it happen.

I’ve decided to make sure I take time to “do something crafty” each day.  I was inspired by a woman at a quilt show a few years ago who quilted for 1/2 hour per day.  Some days she did little projects and some days she did a little bit of a bigger project. I think I would be so much happier (which will make me a better person) if I took time to do this each day.

Yesterday was the 1st day of Lent and I made a tutu.  I will actually be doing quite a bit of this over the next few months as I am going to have a tutu booth at a vendor fair in May.

photo 1(2)

This one is not totally done, so I have a little more work ahead of me tonight. This may actually be one of the first tutus I sell. A lady online said she was looking for some tutus locally and someone referred her to me.  I would love to have some sales under my belt before I set up a whole booth of this delightful tullishness. I make my tutus fairly simply by sewing an elastic waistband and then tying on the tulle.  This particular tutu is kind of interesting because I did 2 red, 2 black, 2 red and so on.  Depending on how you fluff the tulle, it can look mostly red (as it does in the picture) or black.

How many tutus will I make for my booth?  I am planning on about 100 (20 or so in 5 different sizes).  Just like with my OCD cookie baking, I put together a spreadsheet of color combinations and how much tulle each size takes.  I just ordered 85 – 100′ rolls of tulle from my favorite website, Papermart.  Who doesn’t need 8,500 yards of tulle lying around their house?!??!?!

Can’t wait to update you on my progress!


Leave a comment

Wishing you a Wii-ly Happy Valentine’s Day!

I guess I’m on a roll with the digi scrap program this week. In addition to using it for my Girl Scout Cookie thank you notes, I’ve also used it for my children’s Valentine’s for a number of years.

I love that they can have really personal Valentines to hand out to the class. Again, I make them as 4″x6″ cards (or sometimes 3″x5″) which I can print out as pictures.

Blank Wii

I usually start “bugging” my kids about what they want to be for Halloween sometime in August. I am the “Queen of Last Minute” (no joke, I think the first pin I ever pinned on Pinterest was a sign that said, “Don’t rush me, I’m waiting for the last minute.”), but I do not like being left in the lurch for Halloween costumes. My son has pretty much always opted for something he can buy at the store. That was fine with me because I was not going to attempt to make a homemade Star Wars character anyway. This past year, he told me early on that he wanted to be a Wii Remote. Um, excuse me, you want to be what?!?!?!? I thought he was kidding. I also thought he would change is mind. No such luck, he had decided what he wanted which presented Mommy with the awesome challenge of making his dream come to life. I am happy to say that I met the challenge and he ended up with a really cool costume! I will do a post on the making of this crazy costume later this summer.

For now, I hope you have a Wii-ly Happy Valentine’s Day!


1 Comment

Halloween/Christmas….Holiday Swap

Well, I originally made the following project as part of a Dorothy from the Wizard of Oz Halloween costume (more my costume creations later because I ROCKED my son’s first ever request for a homemade costume) for my daughter, but they didn’t end up getting used and now they are Mommy’s holiday fun shoe!

photo(2)

This was my first foray into Modge Podge and glitter and I have to say I was HOOKED!

Supply List

  • Canvas shoes (I found these at Michael’s)
  • Mod Podge
  • Glitter
  • Tape
  • Paper to protect your work surface
  • Paintbrush
  • 2 Bowls

I started by covering my counter with paper so that it would not end up glittered and clean up would be easy.  I used tape to mask the areas of the shoe that I did not want to cover with glitter.  I used clear tape which made it a little tricky to see exactly what I did, but you can use your imagination…

????????

Then I mixed up some Mod Podge, a little water and a bunch of glitter in a bowl.  Adding glitter to the Mod Podge gives you better coverage in the long run.

????????

Then you just start “painting” your shoe with that mixture.  After I would paint a small section, I would hold the shoe over the other bowl and pour more glitter on it.

????????

????????

Keep going until the whole thing is covered.  Let it dry and remove the tape.  Enjoy your cute new shoes.

Disclaimer – the glitter can be scratchy around the top, so you might want to make sure you have socks between the shoe and your skin.  This was PART of the reason my daughter refused to wear them on Halloween. We originally thought these would be better for trick-or-treating.  The truth is that she is 10 and I’d also purchased sequin heels for her Dorothy costume.  She would have slept in those if she’d had the opportunity…